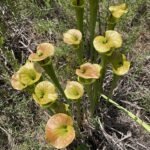
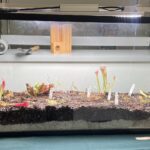
Clemson Extension School and Community Garden Program

A Look Back At the 2022 School Gardening Summer Series: Pedagogical Tools for Garden-Based Education: Engaging All Students

School Garden Series Presentation screenshot

School is back in session, but it’s not too late to catch up on the 2022 School Gardening Summer Series. Our first speaker Dilafruz Williams, Ph. D., shared some of the promising practical pedagogical tools embedded within the acronym G.A.R.D.E.N.S. Her presentation focused on engaging all students in garden-based learning. Using photos and stories, she shared ideas that helped ground our understanding of how garden-based education can be an exciting opportunity to engage diverse learners and make various subjects relevant to students.

Dilafruz Williams, PhD. is a Professor of Leadership for Sustainability Education at Portland State University in Portland, Oregon. With dozens of partners, she has designed, co-founded, and supported several cutting-edge initiatives, such as Learning Gardens Laboratory, Leadership for Sustainability Education master’s program, Sunnyside Environmental School, and an NSF-funded project, Science in the Learning Gardens: Factors that Support Ethnic and Racial Minority Students in Low-Income Schools.A prolific scholar, Dr. Williams has authored over 70 chapters, journal articles, and curriculum resource guides and has given close to 200 invited lectures, symposia, and conference papers. Her research has extensively focused on garden, environmental, and place-based education. Her co-authored book, Learning Gardens and Sustainability Education: Bringing Life to Schools and Schools to Life (Routledge, 2012), presents a practical model of student engagement with gardens that serve as milieus for learning. She is co-editor of Ecological Education in Action: On Weaving Education, Culture, and the Environment (S.U.N.Y., 1999).

Dr. Williams has given workshops and keynote addresses in Australia, Austria, Canada, India, Nepal, New Zealand, Seoul, Korea, South Africa, and the United States. She has graduate degrees from Bombay, Syracuse, and Harvard Universities in the sciences, public administration, and education. For her research, curriculum, instruction, and projects, see http://learning-gardens.org/ and https://sites.google.com/pdx.edu/dilafruz/. 

Trying something new in the garden and the kitchen this summer

I usually grow the same staple vegetables in my garden year after year.  Tomatoes.  Cucumbers.  Zucchini.  Peppers.  Don’t get me wrong – I love growing them, and they are delicious!  But this year, I decided to mix things up a bit and grow some less traditional vegetables – fennel and pineapple tomatillo.

I started my fennel and my tomatillos inside from seed in February before transplanting them outdoors at the end of March.  Both are currently thriving, and this week I harvested my very first fennel bulb!  And now I have little, tiny tomatillos starting to grow.

While I had no trouble growing either crop, the question remains, “How do I use these vegetables once they’re ready to harvest?”  This is a question many gardeners have when growing a less traditional variety and often a deterrent for gardeners from trying something new.  If you are one of these gardeners, see some of the recipes below-featuring fennel and tomatillos.  Whether you are currently growing these in your garden and are wondering what to do come harvest, or whether this inspires you to try growing your own “weird” vegetable next season, I hope these recipes help!

Grilled Fennel

2-3 Fennel bulbs, sliced into 1/4 inch slices

2 TBSP plus more for coating fennel bulbs, Extra virgin olive oil

Fresh thyme chopped, to taste

Fresh parsley chopped, to taste

Fennel fronds chopped

1 TBSP Lemon juice, freshly squeezed

1/4 cup Parmigiano Reggiano

  1. Prepare the fennel: When using fresh fennel from your garden, you will first need to cut off the stalks and fronds. Next, remove any hard or inedible outer sections of your fennel, and cut a small slice off of the bottom of the bulb.  Try to keep the core intact while doing this, as the core will help hold your fennel together as you slice it.  To slice the fennel, hold the bulb vertically and slice from top to bottom in ¼ inch sections holding the knife parallel to the bulb. Prepare a medium-hot pan for your fennel slices.  While your pan is heating up, coat each fennel slice with olive oil.  Place your pieces onto the medium-hot pan.  Flip the slices over every 30 seconds, and continue until you have a nice char on each side.  Once charred, set slices on a plate.
  2. Whisk together 2 tbsp extra virgin olive oil, thyme parsley, fennel fronds, 1 tbsp lemon juice, and Parmigiano Reggiano. Pour over the fennel slices and serve.

Cutting a fennel bulbPickled Fennel

1 fennel bulb, sliced

½ yellow onion, sliced

1 ½ cups rice vinegar

½ cup sugar

Chives chopped, to taste

Dill chopped, to taste

2 tbsp peppercorns

2 cloves garlic, halved

2 tsp salt

Orange peel of 1 orange

  1. In a pot, mix rice vinegar, sugar, peppercorn, and garlic. Bring to a boil.
  2. In a bowl, toss fennel, onion, chives (cut into 1” sections), dill (in large pieces), orange peel, and salt. Once tossed, place ingredients in a mason jar or similar container that has a seal.
  3. Pour hot vinegar mixture into the mason jar over the fennel. Seal the jar and place it in the fridge.
  4. Let sit in the fridge for approximately one week so that the pickling process can take place.

The following recipe can use regular tomatillos or pineapple tomatillos, depending on how much fruity flavor you like.  Traditionally tomatillos are used in salsas, relishes, and chutneys.  Try playing around with different flavor combinations, and maybe make a chunky salsa instead of blended!

Pineapple-Tomatillo Salsa

6 tomatillos

1 cup diced pineapple

2 cloves garlic

1 cup diced red onion

1 tbs extra virgin olive oil

1 lime, juiced

1 habanero pepper

½ cup cilantro

  1. Remove the husks from the tomatillos and cut them in half.
  2. Heat a skillet to medium and add olive oil. When hot, add tomatillos, pineapple, garlic, onion, and habanero.
  3. Cook until charred, and then transfer contents to a food processor. Blend until almost pureed.  Mix in cilantro and lime.


Megan Shearer, Clemson Extension School & Community Gardening Program Assistant

Tips for Cleaning Up the School Garden This Fall

Children preparing raised garden beds
Garden-based learning can improve academic, social, and behavioral outcomes for students.

Cleaning up a school garden after a prolonged absence or period of neglect can seem like an overwhelming task, particularly now as schools are working out how to reopen safely. Although it seems the world has changed in many ways, school gardens still offer students hands-on, experiential learning opportunities that cannot be found inside four walls. Perhaps now more than ever it’s important to give children the chance to explore in a garden and to offer spaces for outdoor learning. Here are a few tips for creating a safe and positive garden environment even if you haven’t been able to work in your school garden in awhile.

Safety First

Before heading out to the school garden for the first time after a prolonged absence, scout the area for potential hazards. Red Imported Fire Ants (RIFA) are notorious for moving into raised bed gardens. Educators will need to reach out to their school administrators or maintenance personnel for help in managing these insect pests.

According to South Carolina state pesticide laws, only licensed pest control operators are permitted to apply pesticides on school-owned property. For more information, consult the Educators’ Guide To Managing Red Imported Fire Ants (Solenopsis Invicta) In School Or Community Gardens.

Occasionally, the corners of raised beds may be broken by lawn mowers or other equipment, check that these are in place, and do not pose a threat or danger to students. Raised beds made with long pieces of rebar or other metal stakes should be capped and secured to avoid injuries.

Tall weeds make the perfect cover for wildlife such as mice, snakes, and other critters. See Clemson Extension Home & Garden Factsheet 2362 “Wildlife Control” for tips on managing these animals. Be sure to wear gloves when handling old nursery pots or lifting items off the ground.

Stack and store garden pots out of the weather or recycle them at a local garden center. Remove any containers or debris where water can collect. Mosquitoes can be pests around school gardens, find tips for reducing mosquito breeding grounds in the Clemson Extension HGIC Factsheet 2435 Mosquito Control In and Around The Home.

Rain barrels or cisterns on school grounds should be cleaned regularly, especially after a long period of disuse. Read more on the maintenance of rain barrels and cisterns in HGIC 1729 Factsheet: Rainwater Harvesting Systems Guidance For Schoolyard Applications.

Stomp the Weeds

Once potential hazards have been removed, begin cleaning up the area around the outside of the raised bed gardens.

An electric or gas-powered string trimmer makes quick work of cutting weeds down around raised bed gardens. Sheet mulching is an alternative that does not require any equipment other than some cardboard and organic mulching material such as bagged or bulk wood chips, shredded hardwood mulch, leaves, straw, or hay.

Start by saving enough cardboard to cover the area around the garden. Remove tape and plastic labels from cardboard boxes. Place sheets of cardboard over the weeds to flatten and cover them. Overlap the edges of the cardboard to avoid gaps in coverage.

Students will enjoy stomping on the cardboard to flatten the weeds beneath. A 1-3 inch layer of mulch, compost, leaves, or straw should be placed on top of the cardboard to cover the garden area. Create a mulched apron of between three and four feet around the entire raised bed.

Start with A Clean Slate

Carefully lift drip irrigation lines out of beds and set aside.  Remove all plant material from raised beds. Shake excess soil off roots and into the beds. Wear gloves to remove weeds that can be easily pulled out by hand. For stubborn weeds, use a hand trowel, shovel or hoe to dig them out. All spent plants and weeds should be bagged and placed in the trash.

If weeds have become overwhelming, a licensed pest control operator may apply an herbicide over the entire area. All label directions should be carefully followed in regards to time between application and reentry for vegetable gardening.

After weeds are under control, add any combination of bagged compost, finished worm compost, leaves, straw, or garden soil to fill the raised beds to within one inch of the top. More soil volume means less watering as new plants grow. An adult should incorporate a slow-release organic fertilizer into each bed according to package directions. The typical recommendation is about one cup per 4’x 4′ raised bed. Mix the fertilizer into the soil with gloved hands or trowel before planting. For more information, refer to the School Gardening for SC Educators Seasonal Planting Guide and Calendar “Building Healthy Soil” section*. See also the Clemson Extension Home & Garden Information Center Hot Topic “Starting A School Garden- Raised Bed Basics.”

Inspect Irrigation

Reassemble and lay irrigation lines back into the beds. Turn the hose on and check irrigation lines and hoses for leaks or damage before replacing drip irrigation lines in the garden. Replace or repair damaged hoses or irrigation lines.

Ready, Set, Grow

School gardens allow students to apply problem-solving skills in the real world.

While August and September don’t often feel cool, many cool-season vegetables and herbs can be planted at this time. Cilantro, parsley, and fennel enjoy our mild fall and winter seasons and make a fun and tasty addition to the garden. Easy to grow greens like Swiss Chard and lettuces can be grown from seed or transplants. Broccoli, garlic, and kale can also be planted later in the season.

To find the best time to plant each crop, educators who have previously taken the online course “School Gardening for SC Educators” can refer to the  Seasonal Planting Guide & Calendar* to plant seasonally appropriate crops for their school gardens. In addition, the Clemson University Home & Garden Information Center Factsheet “Planning A Garden” offers seasonal planting dates for popular vegetable crops.

Resources

Feeling overwhelmed by the amount of work to do to get garden beds back in shape? Remember that the school garden is all about the community and it does not have to be perfect!

Reach out to co-workers, parents, volunteers, or even local landscape companies to lend a hand to get the garden beds back in working order. Many hands make light work!

Amy L. Dabbs, Clemson Extension School & Community Gardening Coordinator, Zack Snipes, Clemson Extension Commercial Horticulture Agent,  & Patricia Whitener, Clemson Extension 4-H Youth Development Agent

*School Gardening for SC Educators Seasonal Planting Guide and Calendar Upstate Region and School Gardening for SC Educators Seasonal Planting Guide and Calendar Lowcountry Region are technical guides that are part of the online course “School Gardening for SC Educators” and may be purchased online.

Fragrant Lavender Perfect for Family Herb Garden

Lavender (Lavandula sp.) is a beautiful perennial herb grown for its purple flowers, calming scent, and medicinal qualities. It is a perennial herb that develops woody branches and grows up to 3 feet tall over the years. The bright purple flowers bloom on the end of spikes and release a lovely fragrance.

Not all lavender species will survive in South Carolina, though, so research the cultivar you choose before planting in your garden.  Types that grow best in a hot climate are Spanish lavender (Lavandula stoechas), French lavender (Lavandula dentata), and sweet lavender (Lavandula heterophylla). These

French lavender growing in a raised bed
French lavender in my garden.

will need full sun and excellent soil drainage to avoid mildew.

My lavender is planted near my vegetable garden to help attract pollinators to my flowering plants.  Bees flock to the purple flowers and lavender scent.

Lavender is also one of my favorite scents, so I love being surrounded by the fragrance of lavender as I work in my garden.  Lavender leaves and flowers can be harvested and used in your home in potpourri, tea, and for flavoring desserts. It also works as an anxiolytic (anxiety reliever) and a sedative, so many people use lavender sprays or oils before bed.

Megan Shearer
Megan Shearer, Program Assistant, School & Community Gardening, Clemson Extension

Grow An Herb Garden- Plant Basil

Genovese basil is perfect for use in homegrown pesto. (Photo A. Dabbs)

Basil (Ocimum basilicum)is an herb garden staple in our household.  A popular ingredient in cooking and so easy to grow, many varieties are also so beautiful they can be used as ornamental plants in the landscape!

Basil is a warm-season, annual herb that is easy to start from seed indoors.  In the coastal region, we started seeds at the beginning of March and transplanted them outdoors in mid-to late-April (once the ground temperatures are in the 70s).

Basil prefers full sun, so be sure to plant somewhere that receives at least six hours of sun per day. Once the basil is established, it will begin to produce flowers and then seeds. Pinch off flower buds as they appear to create thicker plants with more leaves for harvesting and to prolong its life in the garden. Harvest basil by cutting or pinching off individual leaves, or by cutting a section with multiple leaves.

There are many varieties of basil, each with a different flavor profile. I like to grow three or four different varieties each year so I can experiment with them. Here are some of the varieties that I like to grow:

Genovese is the type most people are familiar with. It is very popular in Italian cooking. It has large, dark green leaves and is great for making pesto. This is a staple variety that I grow every year in my garden.

‘Pesto Perpetuo’, sometimes called columnar basil is a hybrid basil often used in ornamental gardening because of its variegated leaves and upright form. It is not typically used for cooking.  Since it is a hybrid basil you will have to purchase transplants at the garden center since it does not produce viable seeds.

‘Dark Opal’ is a beautiful variety of purple basil. I love using this in ornamental beds because its dark leaves provide a great contrast with other plants.  It also has a lovely, tangy flavor for use in cooking. Purple basil is pretty in salads or bottles of vinegar, rather than in traditional pesto dishes.

Thai Basil is most often used in sauces and Thai cooking because of its licorice or anise-like flavor. The leaves are narrow compared to other basils, and it produces beautiful purple flowers. I use Thai basil most often in my own kitchen.

Lemon Basil is exactly what the name suggests, lemon-flavored and scented. Like Thai basil, the leaves are narrow. While this can be used in any basil recipe that you want to have a citrusy taste, my favorite use is to add to homemade lemonade!

We use basil almost daily at our house.  We incorporate it into pasta sauces, Caprese pizzas, and in an easy dip for bread.  Just mix freshly harvested basil, crushed garlic, salt, pepper, and balsamic vinegar, with olive oil in a bowl and swirl fresh bread in it.

Below are two of my favorite basil recipes:

Basil Pesto

  • 2 cups basil, fresh-picked
  • 2 cloves garlic
  • ¼ cup pine nuts (can substitute sunflower seeds or walnuts)
  • 2/3 cup extra virgin olive oil
  • Salt and pepper
  • optional: ½ cup parmesan cheese

Blend all ingredients in a blender or food processor.

Basil Lemonade

  • 1 cup of sugar
  • 1 cup firmly packed basil leaves
  • 6 cups of water
  • 1 ½ cups freshly squeezed lemon juice

In a saucepan, muddle sugar and basil together with a wooden spoon. Add in 2 cups of water and simmer over medium heat, stirring frequently. Continue until all of the sugar is dissolved. Remove from heat and allow basil to steep in sugar until cool. This is your simple syrup.  Once the syrup is cool, strain into a pitcher. Add 4 cups of water and the lemon juice. Stir well! Garnish with basil and lemon.

Megan Shearer
Megan Shearer, Program Assistant, School & Community Gardening, Clemson Extension

It’s Thyme to Grow An Herb Garden

Thyme growing in a strawberry jar.

Thyme is a low-growing, perennial herb from the Mediterranean with small, oval leaves that produce a strong aroma when crushed.  Thyme features clusters of lilac flowers that attract bees and butterflies. While used for cooking primarily, it also works well as an edging or groundcover because of its low height, mounding nature, and attractive flowers.

Tuck thyme into container gardens where it will drip gracefully over the edge or plant it in the ground. Like most herbs, thyme prefers well-drained soil and full sun.  While thyme is a low growing herb, some species of thyme will reach up to one foot in height. This extra height allows for more air circulation and makes it generally more tolerant of humid southern climates.
There are several varieties available commercially, but for cooking, choose common thyme (Thymus vulgaris) or lemon thyme, which has lemon-scented leaves and a zesty flavor.

Thymus x citriodorus ‘Aureus’ has gold, lemon-scented foliage, and variegated leaves. Its upright form makes it ideal for landscaping.

Thymus  × citriodorus ‘Argenteus’, also known as silver thyme, has white variegated leaves and lilac flowers.

Thyme can be started from seed or purchased as transplants. Add thyme leaves to chicken, fish, or soup. Chop leaves and mix with softened butter to make your own herb butter. We enjoy a pat of thyme butter on top of a grilled steak!
Megan Shearer
Megan Shearer, Program Assistant, School & Community Gardening, Clemson Extension

Don’t “Dill-Ay” – Plant an Herb Garden

Feathery dill ready to be planted in the herb garden.

Dill (Anethum graveolens)  is a feathery herb great for cooking and attracting pollinating insects. It tops out at around 3 feet tall with yellow umbel shaped flowers.

Swallowtail butterflies use dill and other members of the carrot family (Apiaceae) to feed their young.  So if you are trying to attract more butterflies to your landscape, consider planting this herb.

Dill is easy to grow from seed sown in fall or early spring. It prefers cooler weather, so don’t wait to plant in the heat of the summer.  To use dill for cooking, harvest the feathery young leaves of the plant. Use the fresh foliage to season baked salmon along with a squeeze of lemon juice. Serve with roasted potatoes and steamed broccoli for a delicious and healthy side dish.

Dill is also the key ingredient in homemade ranch dressing or dip.  Use dill when pickling excess vegetables harvested from your garden. However, the ripe and unripe seed heads the parts best for use in pickling.  My favorite foods to pickle are cucumber, fennel, beets, okra, and sauerkraut.

Here is s favorite recipe using dill.  Try this fresh and light version of potato salad; it makes a perfect side dish for summer picnics.

Red Skin Potato Salad

  • 2 pounds red potatoes, cut into cubes
  • Salt
  • ½ cup fresh dill, minced
  • ½ cup capers
  • 1 bunch green onions, chopped

For dressing:

  • 1 tsp fresh lemon zest
  • t¼ cup fresh lemon juice
  • 2 tbs chopped fresh dill
  • 1 ½ tsp Dijon mustard
  • 2 cloves garlic, minced
  • 1 ½ Tbs tahini
  • ½ cup extra virgin olive oil
  • Salt and pepper

1. Put potatoes in a large pot of salted water and bring to a boil. Reduce heat and simmer for about 7 minutes. Drain potatoes and set aside. Once cool, toss with dill, capers, and green onions

2. Prepare the dressing by mixing all the ingredients together. I use a food processor to mix the dressing. Add water or olive oil as necessary to thin if needed.

3. Toss the dressing over the potatoes. Enjoy!

Megan Shearer
Megan Shearer, Program Assistant, School & Community Gardening, Clemson Extension

It’s Grow An Herb Garden Week!

Herbs grow well in containers.

Herbs make useful and versatile additions to any garden. Culinary herbs such as mint, rosemary, and thyme are perfect for snipping into recipes and are easy to grow, thriving in patio pots and kitchen gardens.  Fragrant foliage and flowers are useful in creating herbal teas and adding fragrance to potpourri, lotion, and soap.  Many herbs attract beneficial insects such as butterflies and bees as well as hummingbirds to the garden.

Aromatic oils are released when the foliage of popular herbs is brushed against or crushed, so don’t be afraid to touch them as you move through the landscape.  Encourage young gardeners to take breaks from homeschooling to sniff, taste, and observe in your herb garden.  Children can also harvest herbs such as basil, mint, and rosemary to add to family dinners.

Nectar sipping hummingbirds, butterflies, and bees provide entertainment as they visit flowering herbs, so plant them near patios and porches for “dinner and a show” while spending extra hours at home this summer!

To grow an herb garden, start by reading factsheet #1133 from the Clemson University Home & Garden Center “Herbs’.

Help children explore herbs with these fun ideas from Kidsgardening.org, including making herbal sachets and experimenting with herb butter.

We will share more of our favorite herbs to grow all week!

Amy Dabbs, Clemson Extension School & Community Gardening Coordinator

Build A Garden Trellis- An Engineering Challenge In the Garden

Many warm-season vegetable crops will need support as they grow. Sprawling plants such as vining cucumbers, zucchini, and tomatoes will quickly overrun our 4’x8′ raised bed if they are not corralled.

To save space, I decided to build a trellis for my garden, which will allow the cucumbers and zucchini to grow vertically. Here’s how I made a natural trellis for my garden in under 30 minutes with materials already on hand:

Supplies You Will Need

  • Yarn or twine
  • Scissors
  • Pruners
  • Branches (about ½ to 1 inch thick and 4 to 6 feet in length, as straight as possible).

I used branches from pruned crape myrtles to create our trellis. Choose branches that are not too thick, as they will make the trellis too heavy, and it might fall over. Conversely, ensure the branches are sturdy enough that they can hold up a massive zucchini vine and its fruit.

  1. Use hand pruners to clean branches by cutting off twigs and leaves. Wait to shorten the length of the branches since it is better to make your trellis too big and trim it later.
  2. Place sturdiest branches vertically into the ground 6″ to 12″ apart (the exact distance may depend on the type of vegetable you are growing, and personal preference). Make sure the branch goes into the soil at least six inches, and firm the soil around the base. Pile up extra soil to secure the vertical branches if necessary. I used four upright branches placed 1 foot apart (making a 4 foot- wide trellis) for my garden.
  3. Cut twine into 6″ pieces. Tie the twine around every intersection of the branches, so if you are doing four vertical branches and three horizontal branches, you will need 12 pieces of twine.
  4. Secure a limber branch horizontally across the four vertical branches. Weave this branch between the uprights about 6″ to 12″ from the ground. The exact distance depends on the crop and personal preference. Use a piece of twine to tie each intersection of the branches using a constrictor knot; it may be helpful to have a second set of hands so one person can hold the branches while the other ties. (Not sure how to tie a constrictor knot? Watch this helpful video https://www.youtube.com/watch?v=r2XqvsnWiu8&app)
  5. Repeat the previous step for each horizontal branch as you add to the trellis. Maintain spacing of the branches to 6″ to 12″ apart.
  6. Once you are satisfied with the overall size of your trellis, use your hand pruners to trim the ends of the branches that are too long.

Different types of trellises may work better for your gardens, such as an A-frame trellis, a pyramid trellis, or even an arching trellis. You can get creative with the design use materials such as chicken-wire to add support for your vegetables.

My colleague, Amy Dabbs, made a tomato cage for her patio tomatoes using a similar technique. She found a forked branch that had fallen in the yard, added another and viola, a homemade tomato cage!

Creating a trellis or support is a fun engineering challenge to help students to think outside the box!


Megan Shearer
Megan Shearer, Clemson Extension Program Assistant, School & Community Gardening


Family-Friendly Seed Starting

Peat pellets have been soaked and are ready to be planted with seeds.

Planting flowers, vegetables, and herbs from seeds is an excellent family-friendly activity. There are so many lessons to be found in the simple act of starting seeds.

If you plan on growing a large garden or you prefer a wider variety than found at the garden center, starting a garden from seed can be more cost-effective.

For example, I plan on growing several varieties of peppers, pineapple tomatillos, and a wide array of herbs in our vegetable garden this summer.  Since peppers are one of my favorite foods, so I chose seeds for shishito, cayenne, habanero, serrano, bell, lemon drop, and banana peppers.  Additionally, I purchased pineapple tomatillo, dill, fennel, and mint seeds.

Here is what you will need to start plants from seed:

  • Soil-less seed starting mix or potting “soil”* or expandable peat pellets
  • Peat pots, seed tray with drainage holes or clean recycled containers with holes for drainage
  • Leakproof tray or container
  • Clear lid to cover trays or containers
  • High-quality seeds
  • Grow light or partially shaded outdoor table
  • Labels- Make your own using popsicle sticks or cut strips of plastic from the recycling bin
  • Pencil or marker

Make sure your seeds are from a good source and not too old (check the date at the back of the packet). Older seeds may have reduced germination rates.  Seeds with a hard seed coat such as peas and nasturtium may be soaked in water for 24 hours before planting to speed up germination.

Seeds require constant moisture to germinate. Thoroughly moisten seed starting mix before filling peat pots, seed trays, or containers. *Seed starting mix is a sterile soil-less peat-based growing medium.  While potting soil can be substituted, do not use garden soil or compost as it may contain pathogens that will cause young seedling to die.

Mini greenhouses make seed starting indoors easy. Remove lids once seedlings have sprouted.

Compressed peat pellets expand when placed in water. I find using hot water to soak them before planting seeds, speeds up the expansion of the dry peat inside them. Once the seedlings are ready, you can plant the entire thing to avoid disturbing the roots.

Place your seeds in a small hole about ¼ to ½ inch deep in each pot or cell; the seed package will tell you exactly how deep to plant the seeds, and how many you should plant in each container. Cover over the seed with potting mix, again following package directions on the depth of coverage.  Make sure to label your seeds, so you know which is which!

Recycled berry container has been washed and is ready to reuse as a mini greenhouse to start seeds.

You must never let young seedlings dry out, but trying to water individual seedlings is difficult. Try watering from the bottom by placing the peat pots or seed trays into a larger pan or dish.  Fill the outer tray with about ½ inch of water and refill as the seedlings use the water, and the soil begins to dry out.  Check daily to make sure soil around seedling is moist but is not overwatered.

Finally, place this tray under a grow light.   Choose an adjustable light or make your own using DIY plans available online. Place the grow light close to the plants at first and raise the bulbs as your plants get taller.

Placing seedlings in a window will not provide enough light, and the seedlings will stretch, become weak, and it’s unlikely they will make it to the garden.

Thin multiple seedlings to just one healthy plant.

Alternatively, you can place trays outside in a partially sunny area, protected area.  A grow light helps seeds germinate quickly and more consistently.

As your seedlings sprout, you will notice that some pots have multiple seedlings—thin seedlings to one per container by cutting the weaker stems with a small pair of scissors. This step ensures that the final plant is healthy by eliminating competition for nutrients.

Seed starting can be an exercise in patience; some seeds take much longer to sprout than others. Peppers, for example,  can take weeks to germinate.

Once your seedlings have at least one set of true leaves, they are ready to transplant to your garden. How long this takes depends on the vegetable or herb variety, but the seed packet will give you an estimate.

Growing plants from seed is a joyful and rewarding experience for gardeners at any age!

Megan Shearer


Megan Shearer, Clemson Extension School & Community Gardening Program Assistant