Many warm-season vegetable crops will need support as they grow. Sprawling plants such as vining cucumbers, zucchini, and tomatoes will quickly overrun our 4’x8′ raised bed if they are not corralled.
To save space, I decided to build a trellis for my garden, which will allow the cucumbers and zucchini to grow vertically. Here’s how I made a natural trellis for my garden in under 30 minutes with materials already on hand:
Supplies You Will Need
- Yarn or twine
- Scissors
- Pruners
- Branches (about ½ to 1 inch thick and 4 to 6 feet in length, as straight as possible).
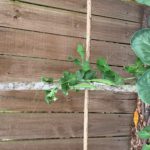
I used branches from pruned crape myrtles to create our trellis. Choose branches that are not too thick, as they will make the trellis too heavy, and it might fall over. Conversely, ensure the branches are sturdy enough that they can hold up a massive zucchini vine and its fruit.
- Use hand pruners to clean branches by cutting off twigs and leaves. Wait to shorten the length of the branches since it is better to make your trellis too big and trim it later.
- Place sturdiest branches vertically into the ground 6″ to 12″ apart (the exact distance may depend on the type of vegetable you are growing, and personal preference). Make sure the branch goes into the soil at least six inches, and firm the soil around the base. Pile up extra soil to secure the vertical branches if necessary. I used four upright branches placed 1 foot apart (making a 4 foot- wide trellis) for my garden.
- Cut twine into 6″ pieces. Tie the twine around every intersection of the branches, so if you are doing four vertical branches and three horizontal branches, you will need 12 pieces of twine.
- Secure a limber branch horizontally across the four vertical branches. Weave this branch between the uprights about 6″ to 12″ from the ground. The exact distance depends on the crop and personal preference. Use a piece of twine to tie each intersection of the branches using a constrictor knot; it may be helpful to have a second set of hands so one person can hold the branches while the other ties. (Not sure how to tie a constrictor knot? Watch this helpful video https://www.youtube.com/watch?v=r2XqvsnWiu8&app)
- Repeat the previous step for each horizontal branch as you add to the trellis. Maintain spacing of the branches to 6″ to 12″ apart.
- Once you are satisfied with the overall size of your trellis, use your hand pruners to trim the ends of the branches that are too long.

Different types of trellises may work better for your gardens, such as an A-frame trellis, a pyramid trellis, or even an arching trellis. You can get creative with the design use materials such as chicken-wire to add support for your vegetables.
My colleague, Amy Dabbs, made a tomato cage for her patio tomatoes using a similar technique. She found a forked branch that had fallen in the yard, added another and viola, a homemade tomato cage!


Creating a trellis or support is a fun engineering challenge to help students to think outside the box!